


_ _ _ _ _ _ _ _ _ _ _ _ _ _ _ _ _ _ _ _ _ _ _ _ _ _ _ _ _ _ _ _ _ _ _ _ _ _ _ _ _ _ _ _ _ _ _ _ _ _ _ _ _
Formerly ... CraftyFunParties.com

ATTENTION IPHONE USERS (And some others)
All the files available for download on this site are in ZIP Format. (Clipart, AI Generated Pictures, SVGs and PDFs)
Your device will need to recognize ZIP files, for some devices it may require you download a ZIP APP.

Christmas
Santa Claus, Christmas Trees, Reindeer, Nutcrackers, FREE AI Pictures and SVGs, Craft and Gift Ideas, Decorations, Games and MORE. Everything you need to make your Christmas Merrier

All Clipart on this page
is "Stealable" (FREE)
Click on the pic you want to Download
Follow Us on FB to get updated on what's been added.
More Christmas Can Be Found At ...

See Our Candyland, Chocolate and Gingerbread Page for more Christmas Fun

Snowmen and Winter
See Our Snowmen and Winter Page for everything Cold

How the Grinch Stole Christmas can be found on our Dr Seuss Page

The Nightmare Before Christmas can be found on Our Disney Stories Page
Quick Links For This Page
Santa Crafts - Santa AI Generated Pictures - Santa Decoupage - Santa Busted Canvas - Christmas Trees - Home Decor - Reindeer - O Holy Night - Nutcrackers - Christmas Animals - Christmas Floral - Toilet Paper Roll Crafts - Cricut Projects - Yummy Gift Ideas - Cakes and Treats - Games - Printables


Santa Crafts

Santa Paintbrushes
Add some fur and a face to paintbrush for a cute inexpensive gift.
Awesome for the artist or DIYer on your Christmas List

Santa Scene Wine Bottle Light
I love the look of lights shining through a colored bottle. You can paint a clear wine bottle any color you want. Mix Mod Podge with your paint to make it more transparent so the light will shine through. Cover it with a 2nd coat of Mod Podge when it's dried and add Crystal glitter. Cricut and Silhouette can add a vinyl cut from the SVG. Non Cricut people can just embellish it with ribbons, artificial pine, berries, whatever you have on hand.


FREE SVG Files
Click on the ones you want to Download

Wooden Santa
8"x 10"
These are bigger then they look here.They'd make great wall or door decorations

I just painted this one traditional and added the googley eyes

This one I Mod Podged Burlap to his hat and painted him more Rustic

Santa's Magic Key
For Our House Without a Chimney
The key came from Dollar Tree it was part of a Valentine's Day sign I hadn't used. The sign was made with the Cricut. Finished it off with a bow and accents.
Santa AI Generated Pictures
Santa Claus Pictures
FREE AI Generated JPG Files
Click on 1st pic in EACH Section to start the slideshow. There are more then what is pictured here and each pic has a link with it so you can download which ever ones you want.


Head Shots


Traditional
Vintage


Muted
Cartoon
Woodland
Whimsical
Colors


Santa and Mrs
Background Pictures


FREE Christmas Backgrounds
Now You Have Them,
What Do You Do With Them ?
Santa Decoupage

Decoupage an image on to a tin can for a cute vase.
I printed this one tissue paper I taped to a piece of cardstock. I wanted the texture from the can to come through.

This one was decoupaged on to a stovetop burner cover and antiqued.

FREE Picture
Click to Download

FREE Picture
Click to Download


Merry Christmas Wall Sign
I decoupaged this to a Dollar Tree cutting board (I believe this one was $3) Used some Antique Wax over it and glued a Dollar Tree Merry Christmas Sign on it. Quick and Simple

Dollar Tree Stacked Dice
I painted the top one white and decoupaged the Santa face and added a hat. (This is cute by itself without the other 2 dice)
I painted the 2nd one red and added chunky yarn trim
The bottom one I just painted black.


FREE Pictures
Click on the ones you want to Download
Santa Spy Glass Ornament

I used Reverse Decoupage on this one.
How Did I Do This ?
This guide is a slideshow you can click through.. Click on First Pic to start.


This is the image I use. I zoomed in on his eye and printed it on tissue paper taped to cardstock. Click on it to download.

FREE Picture.
I cropped this one.
Click to Download


Santa Candles
Add an image to a candle. Print one of the FREE Images off on to a piece of tissue paper taped to a piece of cardstock. Remove the tissue paper from the cardstock and place on a candle. Cover with parchment paper and use a hair dryer to melt the image into the candle. Confused ? There are better instructions WITH PICTURES on the Halloween Page.


FREE Picture
Click to Download
FREE Picture
Click to Download
Santa Busted Canvas
Busted Canvas is a technique that uses 2 overlapping canvas that appears to have one image breaking through the other.
You will need 2 canvases. One needs to be a stretched canvas the one that is stretched around a wooden frame. The second of the same size is flat.
Busted Canvas

These are easy enough for the kids to do. I printed the images right on to regular copypaper so you don't have to worry about napkins or tissue paper tearing. And they're suppose to appear like they are "Busting" Out so the cuts and flaps don't need to be perfect.
Step By Step Instructions can be found on The Crafts Page


Busted Canvas Santa Present
This is the image I use for the inside. It is Mod Podged to the Flat Canvas
This is the image I use for the front. It is Mod Podged to the front of the Stretched Canvas
This is the image I use for the flaps. It is Mod Podged to the back of the Stretched Canvas
You could use regular wrapping paper. I didn't have any so I just printed them.


Busted Canvas Fireplace Santa
This one I did a little different and made it a shelf sitter. Instead of using 1 Stretched Canvas and 1 Flat, I used 2 of the Stretched Canvases and put them back to back, creating a space between them, that will become the fireplace. I used Dollar Tree Jenga Blocks to make the hearth and the mantle and the opening around the fire section. (There's probably a name for that but I don't know it ;) )
This is the image I use for both the front and the flaps. It is Mod Podged to both the front and back (inside) of the 1st Stretched Canvas. After I cut them I added black paint to "char" the flaps
This was done using 2 5"X7" Stretched Canvases
This is the Santa image I used. It is Mod Podged to the inside of the 2nd canvas. Make sure you place him so he will be seen in the fireplace. (He's NOT centered top to bottom on the canvas)

Mod Podge both of your canvases. Cut the top canvas like you do for a regular busted canvas making sure Santa is shown when the flaps are pulled back. See The Busted Canvas Instructions on the Crafts Page if you are not familiar with this.) Paint the bottom of the inside of BOTH canvases black (The wood) BEFORE you glue them together. That part will show and it's easier to paint before it's glued. Glue the canvases together. Then add your Jenga Blocks and accents.
Not Shown: I painted the back and sides brown to help finish it off and hid the seam on the side with a painted craft stick/popsicle stick. You could decoupage the back and sides with the brick.

Santa Busting Through A Book.
This is a different take on the Busted Canvas. I Love a good book where the characters seem to just jump out of the pages.


I started with a Dollar Tree book. For this one the book was red to start with so I just painted over the title


Click on 1st pic here to start the instructional slideshow.
Christmas Trees


The Gnome tree can be found on the Christmas Gnome Page
The Grinch tree can be found on the Dr Seuss Page
The Nightmare Before Christmas tree can be found on the Disney Stories Page

Several of my ideas I modify things I've found online. Lots of people are doing crafts from Dollar Tree items, Some really cool stuff made from great DT finds. I however never seem to get my hands on the "Good Stuff"
I wanted to do Christmas Trees, YEP small tabletop trees were GONE. I couldn't even find the styrofoam tree forms.
However, my DT had a bazillion of the Metallic trees, no one else seemed to want.

If you unravel the tinsel from these trees, you get a handy plastic tree form


Wrap the tree form with material ( I used DT scarves) or burlap or jute/twine. Decorate with bows, berries, ribbon or just leave them plain,
OR

Leave the tinsel and add a Silly Face. Kids will love it.


FREE SVG Files
Click on the ones you want to Download
35 Feet
Name brand for the price of the less expensive ones
Amazon Paid Link


Pinecone Christmas Tree
I used a Dollar Tree styrofoam cone as the base. Hot glued pinecones to it and filled in with artificial pine and holly. Brushed it all with white paint. The base is a Dollar Tree tin tree skirt I glued to a bowl. I finished it off with ribbon. and fairy lights.


Decoupage is an easy way to personalize your ornaments
Home Decor

Paint and Trim add so much to Dollar Tree's battery operated candles


Christmas Street Lanterns and Candle Jar
I painted glass vases (DT) black , The globes are glass jars I found at Dollar Tree. I frosted them and the Candle Jar with Mod Podge and Crystal Glitter and added some ribbon and accents.

No Sew Tapestry Pillows
Glue the edges of two DT tapestry placemats together, right sides out. These have finished edges so no need to flip inside out, leaving a spot open to stuff. Stuff with polyfil/stuffing (I used a pillow I tore apart) and glue closed. I used two different placemats for 1 pillow and made 2 pillows. I can use both pillows with different sides showing in a chair or I can used the same image side out on each side of a couch and switch the look throughout the month. (Basically giving me what appears to be 2 different sets)
The lanterns would also be cute with a Christmas Village

Christmas Broom
(Chimney Sweep ?)
This is the toilet plunger witch's broom that was so popular at Halloween. I added fake pine, holly and a bow and it's a cute Christmas decoration. I'm putting this one next to the fireplace.


The lanterns were red and green plastic and looked pretty cheap. I painted them with metallic paint and added some accents

How I Made The Broom
I did it in 2 layers. Shorter lengths I attached lower to help cover the plunger. I took my string and wrapped it around a piece of cardboard like 10 times and cut both sides, So I was working with 10 strands at a time. Glued on those 2 sections and wrapped again. Repeating until I went all the way around. Not totally covering the plunger cause there is another layer. Then made longer strands using the same process and gluing them farther up the handle and leaving some jute above the glue line so I could wrap it with jute to finish it off and some will show. How many pieces of jute you need will depends on how thick your jute is and how full you want your broom. I started with a roll of jute and there was lots leftover. (A Real Tutorial is on the To-Do List)

FREE SVG File
Click to Download

Reindeer
Reindeer Noses

Glue felt to jars and add candy for a fun tasty gift,

Reindeer
4"x4" Scrap wood can be easily turned into FUN Christmas decorations
No Sew Reindeer Hobby Horse.
I used a lot of mops for the gnome's beard so I had several mop handles left over. Hobby "Horses" were my solution. No Pattern. No Sew !! I stuffed the sock with polyfil and added a folded wire coat hanger minus the hook, inside so I could bend his head. Made sure I wrapped and glued any possible sharp edges and inserted mop handle. Felt antlers I did use a make shift pattern I googled antler clipart and found one I liked. Cut 4 and glued the seams and stuffed a little polyfill inside. Felt ears I just used triangle pieces of felt I gathered at one end and glued on. Hat is Dollar Tree hat, I cut to fit around ears and antlers, used extras for around his neck. Eyes are buttons I added white paint for gleams. Nose is a painted ping pong ball. Then just added some twine and bells for reins. I am seeing actual Hobby HORSES in my future ... along with unicorns, dragons etc ... Yea I have a Lot of mop handles :D


Reindeer Faces PNG Files

Reindeer Ornament
Reverse Decoupage
This was done on a clear plastic ornament. I used the one shaped like an M&M. Less of a curve then a round one so it's easier to decoupage to. I printed the face on to a piece of tissue paper. Cut it out and coated the BACK of the ornament with Mod Podge. I then placed the FRONT of the image on to it. Once it has dried paint a coat of white paint just over the image. This will make it stand out more. Keep in mind any paint you get on the actual glass will show so try to keep it just on the tissue paper. In this case I wanted a little bit to show, so I made small brush strokes around the face. Then you just decorate it anyway you want. I made ears and antlers out of felt and added some holly and berries. You can add fake snow/beads etc to the inside too. I should had put some of the berries inside ... Hind sight ..


Reindeer Centerpiece
Everything here is from Dollar Tree. I used pieces of styrofoam to raise the trees and the candle and covered them with hot glue I painted with white paint, gloss mod podge and crystal glitter. This one took some time and a lot of glue to cover the styrofoam.
FREE Pictures
Click on the ones you want to Download


This guy I found at Dollar General.
I switched out the material to the plaid so he'd match my decor and added extra fur. Not sure if he is a reindeer or a moose, but he's cute.
Reindeer Pictures
FREE AI Generated JPG Files
Click on 1st pic in EACH Section to start the slideshow. There are more then what is pictured here and each pic has a link with it so you can download which ever ones you want.


Traditional
Red Nose
Silly


He didn't do it on purpose.
I decoupaged the picture on to a Dollar Tree cutting board, added chunky yarn and a sign. He really is Sorry !

FREE Picture. I stretched it to fit
Click to Download
O Holy Night


Clay Pot Nativity Set


Wooden Nativity Set
I've been adding lights to wine bottles for years but it's always involved drilling a hole in the bottle for the chord to go through. These are the coolest things EVER. Battery operated lights that fits into the bottle like a cork.

Amazon Paid Link


FREE SVG File
Click to Download


Clay Pot Ornaments
Paint and decorate small clay pots for fun and crafty ornaments
Angel
Bell


Nativity Scene pieces are great individually too


FREE AI Pictures
Click on 1st pic here to start the slideshow. There are more then what is pictured here and each pic has a link with it so you can download which ever ones you want.


Nativity Scene Charger Plate
I simply decoupaged the picture to a charger plate and added gold rope and raffia
FREE Picture
Click to Download


FREE Pictures
Click on the ones you want to Download

The Little Drummer Boy
I Mod Podged the picture to a Dollar Tree round gift box. I covered it with felt and added jute for trim. Drum sticks are dowels with wooden beads glued to the ends.

Nutcracker Busted Canvas

This is the image I used. I cut it in half. For the inside I used the left side with the nutcracker. It is Mod Podged to the Flat Canvas. For the outside I used the right side with the Christmas Tree. It is Mod Podged to the outside of the stretched canvas


Nutcracker Candle
FREE SVG File
Click to Download

Nutcrackers


FREE AI Pictures
Click on 1st pic here to start the slideshow. There are more then what is pictured here and each pic has a link with it so you can download which ever ones you want.

Nutcracker Centerpiece
For this one I started with the drum. It is made from a Dollar Tree round gift box I covered with felt. The top is made from a canvas similar to the busted canvas. I cut a circle from the canvas and painted the underside black. Cut it like a pizza and rolled the flaps back. Glued the 1st nutcracker to the top so it looked like he was busting out. (Just the drum and nutcracker are cute by itself) I continued by gluing the other 4 nutcrackers to a black plate and glued the drum on top of them. I added the ornaments, berries, holly as accents. The drum sticks are dowels with beads glued to the ends. I finished it off with fake snow (Hot glue painted white and gloss Mod Podge) Crystal glitter makes it sparkle.

Christmas Animals

FREE SVG Files
Click to Download

No Sew Sock Penguin
Use the Sock Gnome base and add some felt to make this cute penguin. Yea I like the BIG eyes :D

Cute Mouse Busted Canvas


FREE SVG File
Click to Download


Christmas Floral

This is a Dollar Tree metal bucket I painted white and covered with Antique Wax. Filled with pine cones and holly and added a bows.

Christmas Glitz
The vase here is a Dollar Tree cylinder shaped gift box. I cut apart a DT pine garland and added gold pine boughs, berry picks ribbon and gold ornaments
Although filling a Dollar Tree tin with cookies may taste better, they can also make a cute decoration. Fill with artificial pine, pine cones, berries, snow. and snowballs, all from DT

Toilet Paper Roll Crafts

Christmas Trees

Angels


Santa

Snowman
Cricut Projects


Reindeer Candy Dispenser
FREE SVG File
Click to Download


Important
These are the Instructions.
YOU NEED THESE
Click Here To Download
Instructions are for the Reinder.
Penguin and Snowman are done the same way

These are set up for clear plastic ornaments that are 3.14 Inches. If a different size is used you will need to adjust the dimensions so it will fit.
Amazon Paid Link


Penguin Candy Dispenser

FREE SVG File
Click to Download


Snowman Candy Dispenser

FREE SVG File
Click to Download
Amazon Paid Link

The instructions were done with just a regular glue stick. We made this to demonstrate how, HOWEVER if you plan to give this to a child who may be a little rough with it, we highly recommend you use a stronger glue.
Amazon Paid Link

The pattern includes a piece that is used to rotate the opening in the bottom so it opens and closes. This works, but like the choice of glue there is a better option. Using a brad would make it stronger and hold up better in the hands of a child.

“Warm Wishes”
“Place Chocolate in mug.
Pour warmed milk over chocolate
and watch the magic explode.”
Thinner fonts work well for writing
with the Cricut Pen, not so much for pictures
This tutorial was designed to make these boxes to hold a Hot Chocolate Bomb, however you can change the message to whatever you want. The main purpose for this tutorial is to show Cricut users how to add writing to your Cricut projects using a Cricut Pen. It will also show you how to use a Scoring Stylus
Christmas Tree Box
SVG File


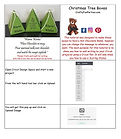
Christmas Tree Box
Step by Step Cricut Instructions

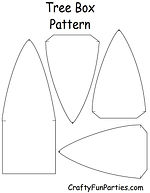
Don't have a Cricut ? No Problem. We also have a printable PDF Pattern.
Instructions for how to put it together are near the bottom of the Cricut Instructions. For Now ... Yea we're working on it.


Hot Chocolate Bombs
are fun way to enjoy the holiday season. Kids love these !!!
This one is the one used in the tutorial. It is a medium size and great for a standard size mug
Hot Chocolate Bomb
Easy to follow Step by Step Instructions
PDF File
Amazon Paid Link

Christmas Tree Boxes
These are the perfect little boxes to hold your Hot Chocolate Bombs
Use WATERPROOF Mod Podge
to Decoupage Dishes


Cookies For Santa
Cookies for Santa
PDF File

Cookies For Santa Tray
This is a small wooden tray from Dollar Tree

Cookies for Santa
SVG File
Yummy Gift Ideas


2 Minute Microwave Fudge Recipe
-
1lb powdered sugar
-
2⁄3 cup cocoa
-
1⁄4 teaspoon salt
-
1⁄4 cup milk
-
2 teaspoons vanilla
-
1⁄2 cup butter or 1/2 cup margarine
-
1⁄2 cup chopped nuts (optional)
Sift powdered sugar, cocoa, and salt into a 1 quart microwave safe bowl.
Stir in milk and vanilla.
Mix well.
Place butter on top.
Microwave on high, 2 minutes.
Beat with wooden spoon until smooth.
Stir in nuts (OPTIONAL).
Spread in 8 X 8 X 2 inch baking pan.
Chill about 1 hour or until firm.

A Christmas Story Oh Fudge
Decoupage a mug or jar and fill with fast and easy fudge. Cute and Yummy
Printable Clipart
and Recipe


Fill decoupaged mugs with candy or small gifts for a special gift that can be less expensive then a card
Don't Forget Our Current Heroes
Use a photo for a more personal touch.
Use a Sharpie Marker to write or draw anything you'd like on a Dollar Store Mug or Plate. When your finished bake for 30 minutes at 350 degrees. You may see a difference in color for colored markers. Not dishwasher safe.
These have BOTH SVG and PNG Files. For those with a Cricut
SVG File for those with a Cricut
If you are going to both decoupage and write on your item. Write/Color first, then bake, then decoupage

Meowy Christmas
This is a DT white metal bucket I painted to look like a tree. Cat's backside is felt. Love him standing on the ornament. Does your cat knock the ornaments off the tree ?

Candy Bar Snowman
These are cute, easy, inexpensive gifts. Simply wrap a candy bar with white paper. Place one glove inside the other so the recipient gets the pair and use it as a hat. Wrap a bow around the fingers to look like the pom pom. Draw on a face and add a scarf.


Top Hat Gift Box
Paint a Dollar Tree cylinder shaped gift box black add a felt circle to the bottom for the brim. I used Mod Podge to hold the paint and stiffen the felt and add the glitter. Add ribbon and some embellishments. Remove the top and fill with treats or a small gift.
This would also be cute as a Tree Topper.

We WHISK You A Merry Christmas
Add candy to the inside of whisk and add a card.
I wrapped the candy in saran wrap so they didn't fall out.


Cakes and Treats


Santa Cupcakes
Santa Bread


Christmas Tree Cake


Christmas Tree Brownies


3D Reindeer Cookies


Gingerbread Man Cake
Snowman Cupcakes


Christmas Ornaments Cupcakes
Christmas Lights Cupcakes

Games
I Hope Santa Brings Me ...
Players sit in a circle. The first player starts and says, “I hope Santa Claus brings me __________” filling in the blank with whatever present they choose. It can be realistic or outrageous . The person to the left of the starter(clockwise) goes next. They will say, ” I hope Santa Claus brings me a (whatever the first player said and __________” filling in the blank with whatever they choose. This continues moving left around the circle with each person repeating what the previous person said and adding an additional present from Santa until someone forgets a present, messes up the order or in some way makes a mistake. That person is out and leaves the circle. The person to the left of the person that is now out starts the game over again from scratch. Continue playing and eliminating players until only one person remains. That person is a very deserving winner.
Guess How Many Ornaments
Count the number of ornaments on your Christmas tree and have your guests write down their guess as to how many there are.
The person who has the closest guess is the winner.


No Presents
Pass out a Candy Cane or a small token to each of your guests as they arrive. When all your guests have arrive the game starts. Inform them from that point forward they can not say the word Present/Presents. If a player gets caught saying the word whoever catches them gets their candy cane/token and they are out. The game is continued through out the party with players losing one candy/token cane each time they say Present. Whoever has the most when the game ends wins.
Variations:
-
Use "Santa" "Christmas" or any other Holiday word instead of Presents
-
Dollar Tree usually has Holiday Hats or Ties you could use as tokens. Players must wear all the tokens they've collected. The person leading the game will be well accessorized :D
Stocking Stuffers
Fill a Christmas Stocking with an assortment of wrapped gifts, candy, candles etc and tape or pin it closed. Have your guests write down their guess as to how many items are inside by site only no touching it. The one who guesses the closest wins the filled stocking.
If there is a tie you can have a “tie breaker” round. Have the tied players taking turns naming one thing they think is inside the stocking. The first one who guesses an item inside wins.


Ugly Sweater Decorating Contest
Buy some plain colored sweatshirts and have people decorate them with whatever they'd like. We did it for work and each department decorated one. This could be done with friends and family, either individually or in groups.

Christmas Card Toss
Get about 10-12 holiday cards. Place a good sized basket, such as a laundry basket, in the middle of the room about 6 feet away from the players. Have each player take a turn and try to toss the Christmas cards into the basket one by one. This is much harder than it seems at first, you will be surprised how those cards fly about!
The winner is the one who gets the most cards in the basket after everyone has had a turn. For a tie have the tying players shoot 4-5 more cards each and the one with the most in the basket wins.


Guess The Candy Game
Wrap and number several boxes of Movie Theater Candy and have your guests indentify them by shaking the boxes.
The person who guesses the most correct is the winner


Little Debbie Punch
My family loves Little Debbies. So I made a punch board out of Solo Cups, tissue and Dollar Tree Foam Board. Little Debbie clipart I got off the internet. I placed a random number in each cup. Then wrap up several boxes of Debbies and numbered them. Guest punches a Debbie and wins the corresponding gift. You can either have it "They get what they get" or like a gift exchange the next person can steal or punch.


Human Hungry Hippos
Scatter marshmallows on the table and participants grab for them with Solo Cups on their hands. Whoever gets the most wins. This is a fun game that can be played at any party, not just Christmas. FUN but not real sure how marshmallows ended up in my blinds ???


Emergency Cash
This is a fun alternative to a money card. There's a larger bill under the dollar. I used a Dollar Tree frame and simply printed the words on card stock with my printer
Literal White Elephant Gift
Add a trunk and ears to the No Sew Snowman and you have your White Elephant gift.
Printables


Add a Cotton Ball* each day leading up til Christmas. When Santa's beard is complete he is ready to make his appearance.
*I cut the cottonballs in half

Give a Christmas Match Sheet to everyone.
Pick 1 player to be “It” have everyone else fill in the blanks by guessing what the “It” person wrote.
OR
Partner up with 2 player teams. One player fills in the blanks, the partner tries to match what they believe their partner wrote.
The most matches wins


