

_ _ _ _ _ _ _ _ _ _ _ _ _ _ _ _ _ _ _ _ _ _ _ _ _ _ _ _ _ _ _ _ _ _ _ _ _ _ _ _ _ _ _ _ _ _ _ _ _ _ _ _ _
Formerly ... CraftyFunParties.com

ATTENTION IPHONE USERS (And some others)
All the files available for download on this site are in ZIP Format. (Clipart, AI Generated Pictures, SVGs and PDFs)
Your device will need to recognize ZIP files, for some devices it may require you download a ZIP APP.

Halloween

All Clipart on this page
is "Stealable" (FREE)
Click on the pic you want to Download
Follow Us on FB to get updated on what's been added.
Ghosts, Skeletons, Witches, Monsters Crafts and Instructions. FREE SVG Files and AI Generated Pictures. Gnomes, Games and Ghoulish Surprises.
Quick Links For This Page
Ghosts - Skeletons - Witches - Haunted Houses - Monsters - Cats and Bats - Gnomes - Candles and Jars - Eyeballs - SVGs and PNGs - Printable Games - Games
Other Halloween Pages
Pumpkin Crafts, Ideas for carving and painting pumpkins, Clipart and SVGs and MORE
Tricks - Fake Bakes
Looks good enough to eat but I wouldn't recommend it.
Treats - Things you can actually Eat
AND Ideas to collect and store your goodies
Whether you like the slashers, Chuckie, Jason, Pennywise, Freddy etc. OR your Scare Level is a little lower Hocus Pocus, The Adams Family, Beetlejuice etc, you will find it here. AI Generated Pictures, SVGs. Clipart, Crafts, Ideas and More Surprises.
Don't Be "Scared" To Try Our Fun Halloween Projects. They Come With Easy To Follow Instructions. FREE SVG Files, PDF Files that can be cut with a scissors. Vinyl Craft Ideas and MORE.
Ghosts
Dollar Tree Hanging Ghost Makeover


Click on first pic for step by step instructions


Upgrade your DT Hanging Ghost a Little or a Lot
Just add legs to make her a Standing Decoration

OR Give her the Deluxe Makeover
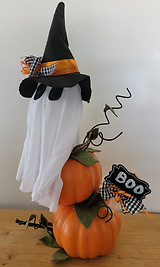
OR Set her in a pumpkin patch


Click on first pic for instructions to attach her to a pumpkin
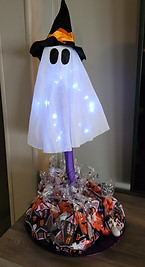
OR Light her up and use her to help accent your candy dish
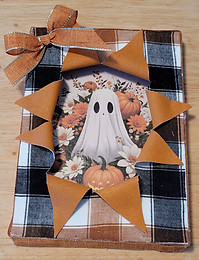
Ghost Busted Canvas
Instructions for the busted canvas can be found on the Crafts Page.
This is the peeking image I used for the FRONT of the Flat Canvas. Click on it to Download
I used material for the FRONT Stretched Canvas and painted the Back of the Stretched Canvas
Click on 1st pic here to start the slideshow. Each pic has a link with it so you can download which ever ones you want.
MORE GHOSTS
FREE AI Generated Files
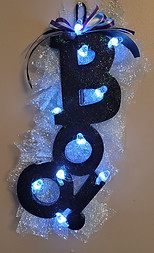
DT Boo Sign with Ghost Lights


FREE SVG Files
Click on the ones you want to Download
Microsoft Fiber Cloth Ghosts
Dollar Tree Styrofoam and Craft Sticks are the base. Then just drape it with the microsoft fiber cloth and decorate.
Add faces for a fun look. I used HTV and ironed them on
I used black felt and Dollar Tree fake eyelashes for this one. The hat is a Twisted Ruffle Hat found on The Sock Gnome Page
Don't have a Cricut, that's ok. You can still get inspiration from the accessories. Witches broom is a dowel and jute. Light up lanterns and stacked pumpkins are both Dollar Tree.


Add Your Crew
Use the same base and cover it with a T-Shirt and some Dollar Tree gauze soaked in tea to make her look more antiqued.

This image was designed by Sybs Crafty Shack she offered it on her Facebook Page and invited people to use it and share their creations. I LOVE a challenge and this one was not that hard the image is adorable !!!
I mod podged the image to the inside of the jar. This is a pickle jar where the opening is large enough that was an option. I then mod podged lace around the jar leaving a hole so you can see the ghost. Rick rack trim and a twisted ruffle hat from the Sock Gnome Page. Finished it with ribbons and flowers
Skeletons

Glass Jar of Skulls
I used a spaghetti sauce jar but a mason jar or any other jar would work. The skulls were purchased at the Dollar Store. I added black lace and ribbon to the lid.

Skeleton Curvy Keepsake Box
Download is on the Tricks and Treats Page

Skull Centerpiece
I used a Dollar Tree candle holder and glued a large bow unto it. Then added a DT Skull and Top Hat. Directions for Top Hat can be found on the Sock Gnome Page

Most Wonderful Time Of The Year Skeleton
Woo Hoo This guy is excited about Halloween. I used a Dollar Tree Skeleton parts. This is the one you can add to a wreath, I glued it to a metal DT pumpkin and added a sign and a bow.

Skeleton and Skull Halloween Mantle
Dollar Store Finds, Glue and Paint can make a Big Creepy Statement


Stacked Skeleton Candle Holder
I cut holes in Dollar Store Skulls and ran a dowel through them to stack them.. I cut a small round piece of cardboard put a hole in the center and glued it to both the dowel and the skull on both ends. Both the top and bottom of the skulls do not have a flat service. so the cardboard will give you a larger contact area when attaching the plates, this will be covered up with the glue. I cut off the dowel so I had a level surface and glued dollar store plates to both the top and bottom.
This could also hold cookies or candies.

Single Skull Candle Holder


Bloody Skeleton Hand

For the single skull I used a plastic soap dish as opposed to the glass plate. It was smaller and weighed less, so I didn't need the dowel. I then dripped hot glue to form drips on all the pieces I wanted to use.


Bloody Help Letters
For the Bloody Help Sign, I dripped hot glue on to a piece of wax paper, let it harden and peeled off the wax paper. wax paper does not peel off entirely but doesn't show where it stuck.
Paint all the Drips Red
I used a red acryllic paint, but afterwards thought it would had looked better with a gloss paint


I added a bloody skull to one of the skeletons so it looked like he was holding it.
Dollar Store Skeleton

Bubble Bath Skeleton
I painted a galvanized metal container I got from the Dollar Store black and added a Dollar Store Skeleton. Bubbles are cotton batting and opalescent stones sprinkled with clear crystal glitter.

FREE SVGs
Click on pics to download


Skull Wreath
Everything here is from Dollar Tree.
I connected 2 of the styrofoam wreaths together with a pipe cleaner and glue and wrapped them with the black creepy cloth. I then glued the sign to the center. Hands are glued and and secured with a pipe cleaner. Added floral and ribbon to finish.

Danger Keep Out
I painted a Dollar Tree pink flamingo to look like a vulture. Everything else is also Dollar Tree except the lava rocks inside the container. Yep EVERYTHING on this property is fair game for crafting.

Add eyeballs to make a skull a little less creepy. Eyeballs are styrofoam balls with felt.

I added a Dollar Tree blow up skeleton to my display. I figure for the $5 he cost me if he only lasts through the season I got my money's worth. I did need to run a strip of duct tape down the backside to keep his head from flopping forward.

Although I love the Crown Royal bags for my gnomes. I've warned my husband about what may be lurking inside those bottles. I decoupaged the skeleton to the front of the bottle. Then turned the bag inside out and mod podged gold paper to the inside of the bag. This will be the flaps. When it was dry I cut the flaps a little bit. (I knew I could cut them more once I figured out where I needed the cuts to be.) Flipped it right side out and glued the bag to the bottle making sure I did not put glue where the cut out was going to be. I folded the bottom of the bag under and hot glued it, to lower the "Crown Royal" logo. I wanted it to lower on the bottle so it would show under the cut out. I finished cutting the flaps and rolled and glued them back. I place it on aluminum foil and used hot glue to drizzle down to make it look like it was oozing out. Peeled it off the foil when it was set. Then painted the hot glue gold and added a layer of gloss mod podge. Then added the skeletons I got from Dollar Tree.
Crown Royal Busted Canvas
This is the image I used but I cropped it.
MORE SKELETONS
FREE AI Generated Files
Click on 1st pic here to start the slideshow. Click on The Go To Link to Download and take as many as you'd like.


Add a Cemetery Vases to your outdoor graveyard


Witches

Witches Mason Jar
I used a Dollar Tree metal mason jar shelf sitter and decoupaged the witch's hats onto it, Added jute and a Do Not Open sign
Witches' Hats
Click on pic to Download
Witch's Broom
Dollar Tree toilet plunger covered with jute. I couldn't find the DT rope that everyone was using. Hat was also a Dollar Tree find I made over with new ribbons.

How I Made The Broom
I did it in 2 layers. Shorter lengths I attached lower to help cover the plunger. I took my string and wrapped it around a piece of cardboard like 10 times and cut both sides, So I was working with 10 strands at a time. Glued on those 2 sections and wrapped again. Repeating until I went all the way around. Not totally covering the plunger cause there is another layer. Then made longer strands using the same process and gluing them farther up the handle and leaving some jute above the glue line so I could wrap it with jute to finish it off and some will show. How many pieces of jute you need will depends on how thick your jute is and how full you want your broom. I started with a roll of jute and there was lots leftover.

Poison Apple
Paint the apple black, insert a thin dowel. Drizzle hot glue and paint with green paint, gloss mod podge and crystal glitter. Add a straw over the dowel and decorate
Witch Busted Canvas


Instructions for the busted canvas can be found on the Crafts Page. For this one I added hot glue to make the cauldron look like it is oozing out.
How to make it ooze:
Make the busted canvas like you would normally do. Use a piece of heavy duty aluminum foil and make sure your foil is flat. If it curves the hot glue will also curve. Make a puddle and insert the completed canvas on it so it will stand up. Keep adding glue down the picture, until you've got it where you want it. When dry remove tin foil and paint it with green acrylic paint. Make the first coat light so it acts like a primer. Add a second coat. It's fairly easy to paint because it's raised. It doesn't have to be even or perfect. When dry use a coat of Gloss Mod Podge and add crystal glitter.
I also added fairy lights I just tucked into the inside of the canvas. It looks pretty cool no matter what the room lighting is set at.
This is the main image I used for the FRONT of the stretched canvas. Back of the stretched canvas was painted green.
This is the peeking image I used for the FRONT of the flat canvas ... I cropped this one for this project.
Click on image to download
MORE WITCHES
FREE AI Generated Files
THERE ALL MORE
Click on 1st pic here to start the slideshow.
There are more here then what is pictured
Cute Witches
Winnie the Pooh Witch
Whimsical Witches

Melting Witch
I painted a Dollar Tree Styrofoam Pumpkin black. I added dowels and polyfil to DT witches legs and inserted them into the pumpkin. Drizzled hot glue over the top, painted it green, a coat of gloss mod podge and crystal glitter. The sign was cut on the Cricut.

Witch's Hat
This was made with a Dollar Tree Toy Traffic Cone and Pizza Pan and wine glass, I painted with black chalk paint. I glued the cone to the center of the pizza pan. Then I glued the pizza pan unto the wine glass, I had turned upside and made a pedestal. I used both E6000 and hot glue. (The E6000 will hold it long term, the hot glue will hold until the E6000 dries). I added the creepy cloth, ribbons, silk flowers and a couple of plastic spiders.

Fortune Teller Witch
Everything here is from Dollar Tree, including the really ugly witch. I liked the concept of her I just didn't care for the face. I solved this by giving her a Twisted Ruffled Hat (Pattern on the Sock Gnome Page) to help cover most of her face.
Haunted Houses


Front
Side 1
Side 2


Back
Haunted House
Traci made this a few years ago. We don't have a specific pattern or SVGs for it.
The frame of the house is made of cardboard boxes cut up ,windows cut out, and then hot glued back together in the basic shape of the house. The frame is then covered. Siding is started at the bottom of the house. Long strips of distressed posterboard overlap the previous piece and are staggered. The windows are left uncovered.

The shingles for the house are made out of posterboard. The posterboard was sprayed with adhesive and sprinkled with sand. The pieces were cut and glued to the frame overlapped and curling some of the edges. Once they were attached they were painted and dry-brushed to give the distressed look.
Click on 1st pic here to start the slideshow. Click on The Go To Link to Download and take as many as you'd like.
Haunted Houses
FREE AI Generated Files
FREE SVGs
Click on pics to download
The windows frames and door are cut from posterboard, painted and distressed. The window frames were then backed with clear plastic. The window detail is create with vinyl or making scores with the Cricut in the plastic.
Monsters and Spiders


Monster Father and Son
Trick or Treating
Both father and son are made from 2 liter pop bottles with the spout cut off and turned upside down. Both were painted purple and felt and pipe cleaner features were added.
Monster Curvy Keepsake Boxes

Monster in a Pumpkin
I used Mod Podge and food coloring to paint a pop bottle I cut in half. I wanted a more transparent look so the light would shine through. For 1 I added skeleton arms from the dollar store I also painted with the mixture, the other I just cut hands from felt. I then added some eyes made from felt and my monsters were ready to escape.

Download is on the Tricks and Treats Page


Spider Stacked Pumpkins
I started with the Dollar Tree stacked pumpkins (The $5 ones) and antiqued with Waverly Antique Wax and glued the larger two together. For the spider I used a styrofoam wreath and covered it with black loofas. I used a couple more loofas to fill in the center. The legs are DT witches legs I stuffed with a wire coat hanger and polyfil and glued them into the the wreath. The eyes are round styrofoam balls I glued felt on to. The hat is a round ice cream bucket and a pizza pan I used as the brim. I painted them and accented them with spider webs and ribbon. I then glued the spider on top of the 2 stacked pumpkins. I glued the smallest pumpkin to his front legs so it looks like he is holding it and covered with webs and spiders. The sign is from Dollar Tree. I sliced the bottom pumpkin and inserted the post and used LOTS of hot glue on the inside to hold it in place.

Cousin It
I covered a pickle jar with a Dollar Tree mop. Then added glasses and Top Hat. Directions for Top Hat can be found on the Sock Gnome Page. You could add lights

Mummy
Dollar Tree round disk, I painted black. Added Dollar Tree eyes and just wrapped the whole thing with gauze and added spider

Mummy Container
This was a plastic container I believe had beef jerky in it. The lid is still removable so you an use it for storage. The eyes are a Dollar Tree styrofoam ball I cut in half and added felt. Gauze and spider are also Dollar Tree finds.

Mummy Dollar Tree Treat Box
Everything here is from Dollar Tree except the legs. They are empty wax paper rolls.
* The empty rolls the DT Mesh come on are great for crafting too. They are the nice thick rolls.

I added the mummy head to 2 of the Dollar Tree stacked pumpkins I had painted white and covered with gauze for my porch. I added DT skeleton arms wrapped with gauze. Trick or Treat Bag with candy corn pumpkins.

This is the image I used
Click on image to download

Frankenstein Wreath
I cut off the bumpy side of Dollar Tree Car Microfiber Washmitts and glued them to a wire frame. I painted a pizza pan white and decoupaged the Frankenstein image to it for the center. I finished it off with ribbon

THERE ALL MORE
Click on 1st pic here to start the slideshow.
Click on 1st pic here to start the slideshow. Click on The Go To Link to Download and take as many as you'd like.
Spiders
FREE AI Generated Files
AI Vampire Picture. Click to Download
Cats and Bats

Black Cat
The black cat is made from a sock similar to the Sock Gnomes. Fill a black sock with a little bit of rice for weight and then the fill the rest with polyfill. Tie off the top and tie off the middle to separate the head from the body. Add a hat, felt features and a bow.


Furry Black Cat
The same concept only cover him with fur. Whiskers are black pipe cleaners, I used a lighter to burn off the fuzz. See how I did the ears on the Animals Page.
FREE SVGs
Click on pics to download
Cats and Bats
FREE AI Generated Files
Click on 1st pic here to start the slideshow. Click on The Go To Link to Download and take as many as you'd like.
Gnomes


Vampire Gnome
Witch Gnome
See My Gnomes Pages for Instructions on how to make the No Sew Gnomes


Monster Mash
Mash up what you learned on our Gnome Page with what you're learned on our Fake Bakes Page

Mad Scientist
The Mad Scientist and his crew have started production on their Brains and Eyeballs Cupcakes. Halloween is always in "Sight" and most don't "Mind" if they are made a "Head" of time. It's not like they'll go bad, they are bad to start with.

Standing Witch Gnome
Add plaid ribbon to your seasonal decorations to help them blend with your home decor.
Ghost Gnomes
Microsoft Cloths you can find in the auto section at Dollar Tree make really cute and soft hats. The ghost on the hat was done on felt on the Cricut. Cheap felt came out kind of wonky but for this project I liked it that way

Spider Web Gnome
Spider Web Gnome with Dollar Tree Light Up Spiders. The battery pack is hidden in the back.

Jack o Lantern Pumpkin Gnome

Spider Gnome
Add pipe cleaner legs to a simple sock gnome. The hat is a Twisted Ruffle Hat found on The Sock Gnome Page
Click on 1st pic here to start the slideshow. Click on The Go To Link to Download and take as many as you'd like.
Halloween Gnomes
FREE AI Generated Files

Did you ever wonder how Little Spiders can make such Big Webs ?
They have help !
This is a RX Bottle Gnome with a faux fur pom pom head. Eyes are from Amazon. Spider is from Dollar Tree
Candles and Jars

Spider Web Candle Jar
I painted a light coat of purple paint on the jar and just added some webs and spiders.


Dripping Candle Toilet Paper Rolls
I used a glue gun and dripped the glue over a toilet paper roll to form the drips on the "Candle" Then painted it white and added a battery operated tealight candle
Zombie Jar
I painted the inside of a jar red and the outside white, Used a little sand paper on the outside to distress it so the red comes through, Glued on some Googly Eyes and dripped melted red crayon over it. Finally I added some First Aid Tape.


You will need: Tissue paper, printer, cardstock, pillar candle, wax paper and a hair dryer.
Tape tissue paper on a piece of cardstock making sure all the seams are covered with tape and print your picture on top of tissued area. I added pumpkin clipart to this one.
Cut around your picture to separate tissue from cardstock. Design needs to be slightly smaller then the candle, both height and width. Do not overlap on the width. Place pictured tissue on the candle and cover it with a piece of wax paper larger then the candle, with enough extra width to make a handle to hold on to. Make sure it's holding the drawing to the candle securely.
Heat the candle with the hair dryer, melting the wax so the tissue adheres to it. Picture will be more transparent as it melts into the candle. Continue all the way around the candle. Remove the wax paper. You can reposition wax paper to go over any spots that were missed.


Personalized Candle
Bloody Candle
I simply melted a red crayon over a Dollar Store Candle.

Decoupage Dollar Store Candle Jar


Halloween Silhoutte Candle Jars
Decoupage Silhouettes to the inside of a jar. Silhouettes here are a simple design that can be easily cut out with scissors. (No Cricut Needed). I used clear crystal glitter on the outside of the jars. Add a battery operated tealight candle. Do not use a real candle, silhouettes are paper and will burn.
SVGs and PNG Files for Ghosts and Tree are available, click on image to download

Scroll Down this page for more FREE SVGs


Combine some of the previous techniques to create a Creepy Candle Display
Add pictures to Candles
Decoupage pictures on to Dollar Store Candles
Toilet Paper Roll Candles painted black and accented with metallic paint
Eyeballs


Eyeball Curvy Keepsake Box
Complete with instructions ;)
Eyeball Glass Jar
Eyeballs were found at the Dollar Store. I added some Window Cleaner to the water to make it blue. Added some ribbon to the lid.

Painted Eyeball Jars
Paint a jar black. Yea I used spaghetti jars AGAIN. (We eat a lot of Italian food :) Paint simple eyes on it and add a bow. Fill with candy or silk flowers. I found these at the Dollar Store.


I'm Watching You Candy Jar
Paint your container black. I used one of the large plastic containers you get at Sam's Club/Costco, this one held Animal Crackers but any container will work. Print the Watching Eye Clipart and decoupage it on your container. Then add some of the black creepy material you can find at Dollar Tree and a Sign.
Watching Eye Clipart

Eyeball Pumpkin
The eyeballs were a Dollar Tree find. There are 2 in a package. For this one I cut the lid as you normally do and clean out the pumpkin., then cut the circle the size of the eyeball. This is where I realized what I thought was my mistake. Neither the hole for the lid nor the circle were big enough to get the eyeball through. The solution was to cut a slit in the back. Which afterwards I realized was probably the only way to do it, there was not enough room on the pumpkin to make both the lid big enough and the hole for the eye, they would had overlapped


Eyeball Gnome and Bucket
The eyeballs were from Dollar Tree. The bucket is filled with styrofoam as a filler, eyeballs and fake green spider webs. I then accented it with hot glue that was painted green and added gloss mod podge and crystal glitter. The gnome is a sock gnome with a twisted ruffled hat. See The Sock Gnome Page for instructions on the sock gnomes.
More AI Generated Pictures
Click on 1st pic here to start the slideshow. Click on The Go To Link to Download and take as many as you'd like. There are more then what is pictured here.
Halloween Backgrounds
FREE AI Generated Files
Click on 1st pic here to start the slideshow. Click on The Go To Link to Download and take as many as you'd like.
Disney Halloween
FREE AI Generated Files
Printable Games
Click on Pics for PDF Files
Find the Horror Movies
How many Horror Movies can you find in this picture ? There isn't an answer sheet for this one. I printed off one for all the players and everyone took turns finding a movie. The first one to miss or repeat another's answer is out. Play continues til there is only one person left.
Halloween Name That Tune
Can you name the title of these Halloweens songs given just one line ?

Halloween
Spot the 12 Differences
Halloween A - Z
How many Halloween things can you name ?
Spider Toss
Spread spider webs (the stretchy kind) in a doorway, corner of the room, etc.. Have players stand behind a line and toss little plastic spiders at the spiderweb, whoever gets 3 spiders stuck in the web the fastest wins.

Mummy Wrap
Divide into teams and see who can cover one of the team mates with the most toilet paper in the allotted time

Games

Pumpkin Ring Toss
Toss Glow in the Dark Bracelets or Necklaces around the stem of a pumpkin


Pumpkin Teeth Guessing Game
Fill a jar with Candy Corn, you have counted out before the party.
Have your guests guess how many candies are in the jar.
All participants get a sample bag of Pumpkin Teeth.
(See Treats Section Above)
The winner gets to keep the jar,


